Games
LEGO TECHNIC: Volvo EW160E – 42053 REVIEW

Technic: Volvo EW160E
Pieces: 1166
Ages: 10-16
Price: £69.99
What’s inside
Bags of Lego bricks
Instruction booklet
Sticker sheet
Background
The Lego Technic range is one of the longest running themes which has now for years been slowly running in the background of the more flashy licensed themes that are immediately recognisable to the general public. However, if you have built a lot of sets, you might find that the build itself is the most fun of the whole experience. The Technic range takes the build experience to the next level concentrating on building real working mechanical systems that actually work.
The external look of Technic models has traditionally been a more skeletal, characterised by the long beams with holes that make up the majority of building blocks used. In older models there usually was almost no actual body work visible on top of the skeleton, but this is something Lego has slowly started to address therefore making the models look closer to their real counterparts. This has also made the models more display worthy although the cost of this is that those mechanical systems underneath are becoming harder to appreciate.
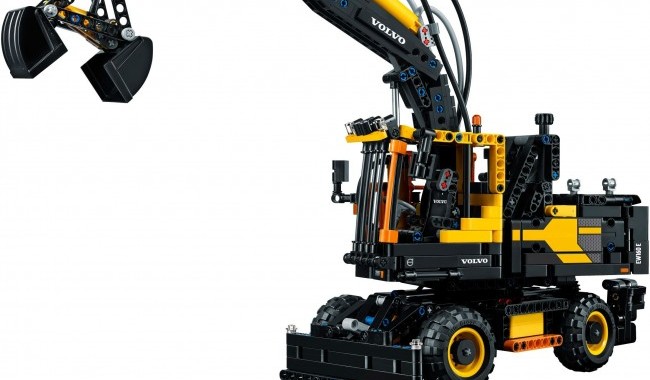
The Volvo EW160E is one of the three new Technic models released this August. The EW160E is a real 2015 model excavator designed by Volvo. This compact, wheeled excavator has been designed to be a versatile tool for industry featuring many advanced features such as the hydraulically raised cab allowing the operator an unparalleled view of the excavation.
The Lego version of the EW160 has been constructed from 1166 pieces and contains all the notable features visible on the original. It also contains a new Lego Pneumatics v2 system which I will explain in a moment.
Building
The build is long for the piece count and fairly complicated as you might expect. Part of the complexity comes from the fact that the Technic models do not split the pieces into numbered bags, meaning that all the bags must be opened and sorted out somehow. Even then, the pure volume of pieces means that there’s plenty of old school piece searching at every stage. And there are plenty of stages. The manual is exactly 250 pages long with 403 steps excluding the optional power functions build (available separately) which adds another 30 steps.
The initial build concentrates on the chassis including the working steering mechanism which links to a wheel at the rear of the body. The chassis also includes the locking support legs which can be manually operated to add stability during excavation. At the front we get what looks like a bulldozer blade which is also manually movable to various positions depending on the use.
The build then continues straight up from the chassis with the installation of the pneumatics system and the raising cab mechanism. The pneumatics system is probably the fiddliest part of the whole build. The pipes come in three different colours and pre-cut lengths to aid in recognition and general understanding of the instructions. Despite this help, it takes plenty of concentration to ensure all the pipes go in the correct connectors as well as through the intended routes within the body. This is also a crucial section to the workings as the pipes actually carry air from the included hand pump to three separate hydraulic cylinders in the excavator arm. These operate the root angle, the elbow and the bucket grip. The operation is through three switches at the back of the body which regulate where the air pressure from the pump is directed.
The pneumatic system is a very clever and well designed system. However, it is not very accurate and therefore it is hard to get the excavator arm to the position you might hope. What’s more, even if you do get it where you want it, there is bound to be some leakage so the next day the arm will have slumped down.
The next stage is the cab which is built separately and attached to the lifting mechanism. The cab is simplistic but still a fairly accurate look and positioning looks natural in the lowered position. The lifting arm mechanism is the only part which really appears out of place when comparing to the real EW160E. It is operated by a simple rotating wheel at the top and the lifting action is very sturdy and realistic looking in its arc. It is also stiff enough that you can leave the cab in any position you would like for display and it will stay there.
Finally the rear of the body is covered in various body parts and plates to give the exterior a more realistic appearance. The body work also gets its share of stickers to add some further detailing such as the air intake grilles and appropriate Volvo branding.
The instructions also include an option to add power functions instead of the pump. I didn’t test this option, but the solution in the instructions does look pretty good with the battery pack hiding itself in the bottom of the chassis and therefore not being too visible from the exterior.

Finished product
It’s refreshing to every so often try one of these modern Technic sets just to see the lengths that Lego design can be taken. The complexity of the operations can be seen borrowed in the standard themes and many larger sets use the Technic skeletons to add rigidity. However, to really see what these pieces and mechanisms are used for there really is no comparison.
Furthermore, the modern Technic sets are starting to look good as well. Particularly this kind of industrial designs with their bright colours and straight angles look very good in this style. I can imagine a nice collection of excavators, trucks, bulldozers, tractors and cranes would look excellent in your Lego collection.
So if you are looking for that next challenge in Lego building, cast your eye on the Technic corner once in a while. You might just get hooked.
Marko Hyypia